
Chapter 4
In-flight: All about instruments, keystrokes and menus
The following is a description of the main systems for controlling the program and piloting the plane. It is assumed that the reader is already familiar with flying, possibly from experience on other simulators. If you are completely new to flying, the tutorials in section 6 are a better resource for learning to fly using FlightGear.
A short leaflet showing the standard keys and designed to be printed can be found at http://www.flightgear.org/Docs/FGShortRef.pdf.
A reference to most of the keyboard controls can be found under the Help menu in the simulator.
4.1 Starting the engine
Depending on the type of aircraft, you may have to start the engine(s) before you can go flying. The instructions below are generic. Check the aircraft help or aircraft tutorials for more specific instructions.
Once you’ve started the engine, you should check whether the parking brakes are engaged. If so, press the ‘B’ to release them.
4.1.1 Piston Aircraft
For piston-engined aircraft, the magnetos are controlled by the ‘{’ and
‘}’ keys. On most aircraft, the starter is engaged using the ‘s’
key. On multi-engined aircraft you can select which engines to control. Use
‘ to select all the engines at once. Most magnetos have 4 positions - OFF,
LEFT, RIGHT and BOTH. So, to start the selected engine, press the ‘}’ key
three times, then hold down ‘s’.
to select all the engines at once. Most magnetos have 4 positions - OFF,
LEFT, RIGHT and BOTH. So, to start the selected engine, press the ‘}’ key
three times, then hold down ‘s’.
Note that the starting procedure for powerful WWII-era fighter aircraft is often more complex. See the aircraft help for details.
4.1.2 Turboprop Aircraft
Starting a turbo-prop engine generally requires simply moving the condition lever from Off to Idle, using ’m’.
4.1.3 Jet Aircraft
Starting a jet aircraft is significantly more complex, and the controls vary between different aircraft.
- Set cutoff ON
- Engage the starter
- Once the engines spools up to approximately 5% N1, set cutoff OFF
- Disengage the starter once the engine has reached operational speed.
4.2 Keyboard controls
While joysticks, yokes and rudder pedals are supported, you can fly FlightGear using the keyboard alone or in conjunction with a mouse, described below.
However you control the aircraft, you will need to use the keyboard for at least some controls.
These key bindings are not hard-coded, but user-adjustable. You can check and change these setting via the file keyboard.xml which can be found in the main FlightGear directory. This is a human-readable plain ASCII file. Although it’s perhaps not the best idea for beginners to modify this file, more advanced users will find it useful to change key bindings according to their wished, e.g. to match other simulators.
4.2.1 Aircraft controls
In order to have full control of the plane during flight via the keyboard you should ensure that NumLock is on, and the FlightGear window is in focus.
The following keys control the engines :
|
|
|
| Key | Action |
|
|
|
| ! | Select 1st engine |
| @ | Select 2nd engine |
| # | Select 3rd engine |
| $ | Select 4th engine |
| { | Decrease magneto on selected engine |
| } | Increase magneto on selected engine |
| ~ | Select all engines |
|
|
|
| s | Fire starter on selected engine(s) |
| M/m | Lean/Enrich selected engine mixture |
| N/n | Decrease/Increase selected propeller RPM |
|
|
|
4.2.2 Simulator controls
To change the view direction, you must de-activate NumLock. The available controls are as follows:
Additionally, the following keys allow you to change the view:
Besides these basic keys there are miscellaneous keys for special actions; some of these you’ll probably not want to try during your first flight:
4.2.3 Autopilot controls
FlightGear supports two types of autopilot - a generic autopilot that works with all aircraft (even those that would not normally have an autopilot), and aircraft-specific autopilots that are controlled from within the cockpit.
The generic autopilot is controlled via the following keys:
Ctrl + T is especially interesting as it makes your aircraft behave like a cruise missile, and follow the terrain. Ctrl + U might be handy in case you feel you’re just about to crash.
When the autopilot is enabled, some of the numeric keypad keys function differently and adjust the autopilot rather than the controls themselves:
|
|
|
| Key | Action |
|
|
|
| 8 / 2 | Altitude adjust |
| 4 / 6 | Heading adjust |
| 9 / 3 | Autothrottle adjust |
|
|
|
Note that some keyboards use“.” instead of “,”.
4.3 Mouse-controlled actions
As well as selecting menu items and clicking on controls in the cockpit, your mouse can be used for a variety of other valuable functions in FlightGear.
There are three mouse modes: Normal (the default), Control and View. You can change between them by using the right mouse button.
4.3.1 Normal mode
In normal mode, you can control the menus and the panel controls. This mode is indicated by a normal arrow cursor.
To change a switch or toggle, simply click on it with the left or middle mouse button.
To change a knob on a radio or linear control such as the throttle, click on the left hand side to decrease the value, and the right hand side to increase the value. Click with the left mouse button to make a small adjustment, or the right button to make a large one. Some controls, such as radios, also support using the mouse wheel.
Pressing Ctrl-C highlights the clickable hotspots and objects.
4.3.2 Control mode
In control mode you can control the aircraft flight controls by moving the mouse. This mode is indicated by a cross-hair mouse cursor.
In this mode, moving the mouse left or right controls the ailerons and rolls the aircraft. Moving the mouse forwards and or backwards controls the elevator and changes the pitch of the aircraft.
Holding the left mouse button down changes the behaviour so that moving the mouse left/right controls the rudder. Holding the middle mouse button down and moving the mouse forwards/backwards controls the throttle.
Finally, the scroll-wheel may be used to set the elevator trim.
This mode is particularly useful if you do not have a joystick, as it provides much better control of the aircraft than using the keyboard. If you intend to use the mouse to control the aircraft regularly, it is recommended that you enabled auto-coordination, so the ailerons are linked to the rudder. This can be done using --enable-auto-coordination or selecting auto-coordination from the launcher.
4.3.3 View mode
In view mode you can look around using the mouse. This mode is indicated by a double-headed arrow cursor.
Simply moving the mouse pans and tilts your view in the current position. This is particularly useful for looking around the cockpit, or out a side window. The scroll-wheel can be used to zoom in or out. Clicking the left mouse button resets the view back to its initial position, usually straight ahead.
Holding down the middle mouse button and moving the mouse allows you to move the viewpoint itself left/right and up/down. Moving the mouse while both the middle button and Ctrl are held down allows you to move the viewpoint forwards and backwards.
4.4 Menu entries
The menu bar provides access to a variety of options for the simulator and the aircraft. Many aircraft have their own menu items, for changing their registration to automatically starting their engines. These can be found at the end of the menu bar.
To display or hide the menu bar, press F10. You can also display the menu automatically by moving your mouse to the top of the screen.
The menu bar provides the following menus and options.
-
File
- Load flight Loads the current flight, by default from fgfs.sav. You should start FlightGear using the same options (aircraft, airport...) as when you saved the flight.
- Save flight Saves the current flight, by default to fgfs.sav.
- Reset Resets you to the selected starting position. Comes in handy if you get lost or something goes wrong.
-
High-Res Snap Shot Saves a high-resolution screen
shot as
fgfs-screen-XXX.jpg to the directory you started the program from, or whatever directory you have set/sim/paths/screenshot-dir to. - Snap Shot Saves a normal resolution screen shot as above.
- Print Screen Prints screen shot (Linux only).
- Sound Configuration Configure the volume for various sound channels, and whether they are heard outside the aircraft.
- Browse Internal Properties Displays a tree view of all the properties within the system. You can navigate through the tree like a graphical directory listing and set properties by clicking on them. Shift-click to display the property on the screen permanently, and Ctrl-click to toggle boolean values.
- Logging Allows you to log various pieces of flight information to a file. You can set the file to log to, the properties to be logged and the interval between logs.
- Quit Exits the program.
-
View
- Display Options Set various display options, including whether the 2D panel, frame rate and chat messages are displayed.
- Rendering Options Displays a dialog allowing you to toggle various advanced graphical options. This allows you to trade eye-candy such as shadows, 3D clouds and specular reflections for frame-rate. To help you achieve a good balance, enable the “Show Frame Rate” option. This displays the current frame-rate in frames-per-second in the bottom right of the screen. Most people find a frame-rate of around 20fps adequate for flying. The frame-rate is affected by the graphical options you have enabled, the current visibility (set by Z/z), the number of objects in view and their level of detail (LOD).
- View Options Configure the different views available.
- Cockpit View Options Displays a dialog allowing you to configure the view within the cockpit, the pilot’s head movement, black-out due to high G, and redout due to negative G.
- Adjust View Distance Displays a dialog showing the current view offset. You can adjust this by dragging the dials. Alternatively you can make small adjustments to your view-point using the mouse (see below).
- Adjust HUD Properties Displays a dialog allowing you to set the HUD settings, such as transparency and whether anti-aliasing is used to display it.
- Instant Replay Displays a dialog to control the instant replay feature. A good tool for checking your landings! Press “p” to end the replay and pause the flight.
- Adjust LOD Ranges Displays a dialog allowing you to set the range at which different levels of detail are displayed. This affects the textures and objects displayed in the simulator.
-
Location
- Position Aircraft (on ground) Displays a dialog allowing you to position the aircraft on the runway of any installed airport. You need to know the ICAO code for the airport you wish to start from (e.g. KSFO for San Fransisco International).
- Position Aircraft (in air) Displays a dialog allowing you to position the aircraft at an arbitary point in the air. You must select a known ground point, e.g. an airport, VOR, long/lat coordinates, and a position relative to that point, e.g distance, direction, altitude. You can also set your initial speed and heading. This is useful for practising approaches.
- Select Airport from List This allows you to select an airport without knowing its ICAO code. You can search amongst all the airports that you have installed. Clicking Apply will place you at that airport on a runway appropriate for the current wind.
- Random Attitude Sets the aircraft with a random heading, speed and attitude. Useful for practising recovery from unusual attitudes.
- Tower position Displays a dialog allowing you to change the airport tower used for the Tower View and Tower View Look From.
-
Autopilot This menu is only available for aircraft that have the default
autopilot configured. Other aircraft may have their own autopilot which is configured
through the panel.
- Autopilot Settings Displays a dialog allowing you to set the aircraft autopilot. You can set the autopilot up in a variety of different ways - from simply keeping the wings level, to following an ILS.
- Route Manager Edit the route (waypoint) list for the autopilot. Waypoints can be airports or fixes. The heading, distance and time to the current waypoint is displayed in the HUD.
- Pop Waypoint Pops the top waypoint from the route list.
- Clear Route Clears current route.
- Set Lat/Lon Format Toggles the HUD Latitude/Longitude format between decimal minutes and seconds.
-
Environment
- Weather Scenario Displays a dialog showing the current weather reported by the closest weather station (usually an airport) as a METAR. You can change the weather scenario between Fair Weather (clear skies, few clouds, little wind), a Thunderstorm (clouds, rain, lightning), the current METAR, or none.
- Weather Conditions Displays a dialog allowing you to set the wind direction, wind speed, turbulence, visibility, temperature, dew point, barometer setting at various altitudes.
- Clouds Displays a dialog allowing you to set the cloud types, elevations and thicknesses. Note that to force a refresh of the 3D clouds, you will need to disable and then re-enable the 3D clouds in the Rendering Options menu.
- Time Settings Displays a dialog allowing you to set the current time in the simulator, speed up the simulation, and change the rate at which time passes in the simulator. Also displays UTC and local time.
- Rain/Snow Settings Displays a dialog allowing you to configure how rain and snow is displayed.
- Wildfire Settings Displays a dialog allowing you to configure if aircraft crashes create realistic wildfires that spread (and can be put out using a water bomber).
-
Equipment
- Fuel and Payload For aircraft that support it, allows you to set the fuel and levels and current payload within the aircraft.
- Radio Settings Displays a dialog allowing you to set the frequencies and radials being used by the radios and navigational equipment.
- GPS Settings Displays a dialog allowing you to set waypoints and view course information for the GPS.
- Instrument Settings Displays a dialog allowing you to set the altimeter pressure and Heading Indicator offset.
- Stopwatch Displays a simple stopwatch. Useful for instrument approaches.
- Random Failures Displays a dialog allowing you to randomly fail various aircraft systems, such as the vacuum, by setting a mean-time-between failure.
- System Failures Displays a dialog allowing you to fail various aircraft systems, such as the vacuum.
- Instrument Failures Displays a dialog allowing you to fail specific aircraft instruments.
-
ATC/AI
- Frequencies Displays a dialog allowing you enter the ICAO code for an airport (or simply click on one of the buttons listing the local airports) and retrieve the radio frequencies for ATIS, and Tower communications.
- Options Displays a dialog allowing you to enable Air Traffic Control (ATC) and computer-generated traffic. You may also set the AI traffic density from 1 (few aircraft) to 3 (busy skies!). This menu also allows you to control the aircraft carriers in the game (see below for details).
- Tanker Allows you to dynamically generate an air-to-air refueling tanker, if your aircraft supports it. See Section 5.8 for further details.
-
Network
- Chat Displays a dialog allowing you chat with other aircraft in the multi-player environment.
- Chat Menu Displays a menu of chat messages which you can transmit to other aircraft in the multi-player environment. Some menus contain sub-menus of options. Note that this is also available by pressing /.
- Pilot List Displays a list of the other multi-player pilots within range, along with their distance, heading and altitude.
- MPCarrier Selection Displays a list of the available MPCarriers.
- Debug The debug menu contains various options outside the scope of this guide.
-
Help
- Help Opens the help system in a browser window.
- Joystick Information Displays information about any joystick in use, including axis and button assignments.
- Basic Keys Lists the basic keys for the controlling the simulator.
- Common Aircraft Keys Lists the basic keys for controlling the aircraft.
- Aircraft Help Displays information specific to the aircraft.
- Toggle Glide Slope Tunnel Displays a virtual tunnel to guide you down to the runway on a normal approach path. Useful if you are having difficulties setting up your approach for landing.
- Start Tutorial Displays a dialog allowing the user to select a tutorial on the current aircraft. This is only available on some aircraft. See Tutorials below for details.
- End Tutorial Ends the current tutorial.
4.5 The Instrument Panel
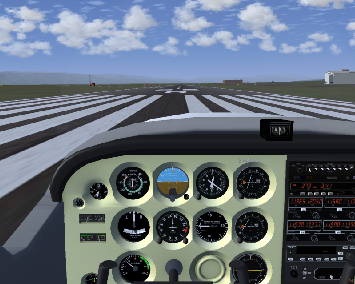
Fig. 6: The 3D cockpit of the Cessna 172.
Aircraft within FlightGear can have both a 2-dimensional instrument panel and a 3-dimensional cockpit. The 3-dimensional cockpit provides a much more realistic pilot-eye view, but can be difficult to read with small monitors.
The default Cessna 172P (c172p) has both a 3-dimensional and 2-dimensional cockpit. The 3-dimensional cockpit is activated by default when you start FlightGear, but you can overlay the 2-dimensional instrument panel by selecting View->Toggle 2D Panel from the menu, or pressing the “P” key.
All panel levers and knobs can be operated with the mouse. To change a control, just click with the left/middle mouse button on the corresponding knob/lever. For controls that have a range of positions, using the middle mouse button for larger adjustments. In general, clicking on the right side of a control will increase the value, while clicking the left side of the control will decrease the value.
Some instruments (particularly radios) also support use of a mouse scroll-wheel to change values.
4.6 The Head Up Display
FlightGear also provides a HUD (Head Up Display) . HUDs are generally found in military aircraft and some very advanced jets. However, FlightGear also allows you to use a HUD on many GA aircraft. To activat the HUD, press ‘h’.
The HUD shown in Fig. 7 displays all main flight parameters of the plane. In the center you find the pitch indicator (in degrees) with the aileron indicator above and the rudder indicator below. A corresponding scale for the elevator can be found to the left of the pitch scale along with a pitch trim indicator. On the bottom there is a simple turn indicator.
There are two scales at the extreme left: The inner one displays the speed (in kts) while the outer one indicates position of the throttle. The two scales on the extreme right display your height - the left one shows the height above ground while the right of it displays hieght above sea-level, both being displayed in feet.
Besides this, the HUD delivers some additions information. On the upper left you will find date and time, along with your current position, in latitude and longitude.
You can change color of the HUD using the “H” or “’h” key. Pressing the toggle “i/I” minimizes/maximizes the HUD.
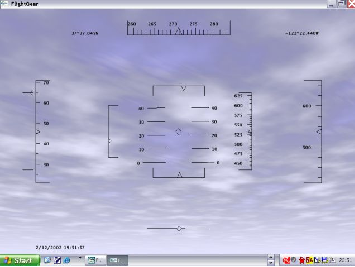
Fig. 7: The HUD, or Head Up Display.
Google Advertisements - Click to support FlightGear
Latest Version
v2.0.0 - 18 Feb 2010
A new major update of the FligtGear simulator. Please check the readme
Notam

Would all pilots try and avoid mpserver02 as its often overloaded.