
Chapter 3
Takeoff: How to start the program
3.1 Environment Variables
There are two environment variables that must be defined to run FlightGear. These tell FlightGear where to find its data and scenery.
You can set them in a number of ways depending on your platform and requirements.
3.1.1 FG_ROOT
This is where FlightGear will find data files such as aircraft, navigational beacon locations, airport frequencies. This is the data subdirectory of where you installed FlightGear. e.g. /usr/local/share/FlightGear/data or c:\Program Files\FlightGear\data.
3.1.2 FG_SCENERY
This is where FlightGear will look for scenery files. It consists of a list of directories that will be searched in order. The directories are separated by “:” on Unix and “;” on Windows. e.g.
/home/joebloggs/WorldScenery:/usr/local/share/FlightGear/data/Scenery
or
c:\Program Files\FlightGear\data\Scenery;c:\Program Files\FlightGear\data\WorldScenery.
3.1.3 Environment Variables on Windows and Mac OS X
The graphical wizard on Windows and the GUI launcher on Mac OS X internally define these environment variables so you don’t have to define these yourself. However, in case you launch FlightGear from command-line, you need to explicitly define these variables.
3.2 Launching the simulator under Unix/Linux
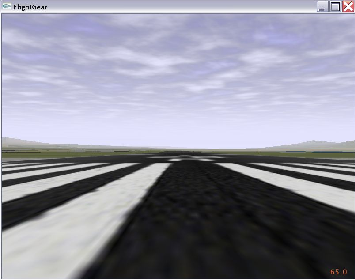
Fig. 3: Ready for takeoff: Waiting at the default startup position at San Francisco Itl., KSFO.
Before you can run FlightGear, you need to set a couple of environment variables:
- You must add /usr/local/share/FlightGear/lib to your LD_LIBRARY_PATH
- FG_ROOT must be set to the data directory of your FlightGear installation. e.g. /usr/local/share/FlightGear/data.
-
FG_SCENERY should be a list of scenery directories,
separated by ”:”. This works like PATH when
searching for scenery.
e.g. $FG_ROOT/Scenery:$FG_ROOT/WorldScenery.
To add these in the Bourne shell (and compatibles):
export LD_LIBRARY_PATH
FG_HOME=/usr/local/share/FlightGear
export FG_HOME
FG_ROOT=/usr/local/share/FlightGear/data
export FG_ROOT
FG_SCENERY=$FG_ROOT/Scenery:$FG_ROOT/WorldScenery
export FG_SCENERY
or in C shell (and compatibles):
/usr/local/share/FlightGear/lib:$LD_LIBRARY_PATH
setenv FG_HOME=/usr/local/share/FlightGear
setenv FG_ROOT=/usr/local/share/FlightGear/data
setenv FG_SCENERY=\
$FG_HOME/Scenery:$FG_ROOT/Scenery:$FG_ROOT/WorldScenery
Once you have these environment variables set up, simply start FlightGear by running fgfs --option1 --option2…. Command-line options are described in Chapter 3.5.
3.3 Launching the simulator under Windows
The pre-built windows binaries come complete with a graphical wizard to start FlightGear. Simply double-click on the FlightGear Launcher Start Menu item, or the icon on the Desktop. The launcher allows you to select your aircraft, the start airport and runway, time of day, current weather, and lots of other settings.
The first time your run it, you will be asked to set your FG_ROOT variable (normally c:\Program Files\FlightGear\data) and FG_SCENERY. This should be a list of the directories where you have installed scenery, typically c:\Program Files\FlightGear\data\Scenery.
If you set invalid values or change your scenery directories later, you can change the settings by pressing the ”Prev” button from the first page of the launcher.
3.3.1 Launching from the command line
Alternatively, you can run FlightGear from the command line. To do this, you need to set up the FG_ROOT and FG_SCENERY environment variables manually.
Open a command shell, change to the directory where your binary resides (typically something like c:\Program Files\FlightGear\bin\Win32), set the environment variables by typing
SET FG_ROOT=~c:\Program Files\FlightGear\data~
SET FG_SCENERY=~c:\Program Files\FlightGear\data\Scenery~
and invoke FlightGear (within the same Command shell, as environment settings are only valid locally within the same shell) via
fgfs --option1 --option2… Command-line options are described in Chapter 3.5.
Of course, you can create a batch file with a Windows text editor (like notepad) using the lines above.
For maximum performance it is recommended that you to minimize (iconize) the text output window while running FlightGear.
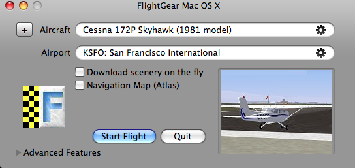
3.4 Launching the simulator under Mac OS X
The prebuilt binary package for Mac OS X comes with the GUI launcher. Simply double-click the FlightGear icon on /Applications folder shows up the GUI launcher window as shown in Fig. 5. The launcher allows you to :
- Select an aircraft and an airport
- Enable/Disable automatic scenery download (using TerraSync)
- Enable/Disable the Navigation Map (Atlas)
- Launch FlightGear
The follow sections describe using these features.
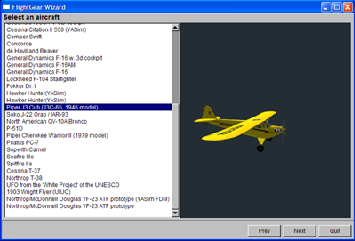
3.4.1 Selecting an aircraft and an airport
At the launcher window, you can select an aircraft and an airport by clicking gear buttons at the right end of the airport/aircraft name. The thumbnail image of a selected aircraft will show up at the image panel on the window. The airport that you select here will be the starting point of your flight. FlightGear uses ICAO 4-letter airport code, which is composed with one or two prefix letters followed by a two or three letter airport code. For example, the ICAO code for San Francisco International Airport is KSFO. “K” in this case is the prefix for The United States, and SFO is the airport code for San Francisco International Airport. You can use Advanced features » Position or Aircraft tab to find an airport or an aircraft.
3.4.2 Enabling on-the-fly scenery downloading
By checking Download scenery on the fly at the launcher
window, the scenery data will be downloaded while you’re flying using TerraSync. The
scenery downloader will install the scenery data into
/Applications/FlightGear.app/Contents/Resouces/data/Scenery-Terrasync.
3.4.3 Enabling Navigation Map (Atlas)
The Mac version of FlightGear includes Atlas, the navigation map that helps your flight plan, for your convenience. Checking this option will automatically launch Atlas when you start the flight. You don’t have to specify any Atlas options. The GUI launcher will specify these for you.
3.4.4 Launching FlightGear - the simulator
Clicking Start Flight button at the launcher window opens up another window - the FlightGear main window. FlightGear immediately starts loading tons of data required for simulation. It may take a while on slower machines to load everything.
3.4.5 Advanced Features
FlightGear has many features and options that you can specify at launch time. Some of these are not changeable from the menu in the FlightGear main window. To enable / disable these features, click the triangle-shaped button at the left-bottom of the launcher window. This displays the advanced features tabs. All settings are saved so you don’t have to respecify them.
General, Features, and Rendering tabs
These tabs let you specify some of FlightGear options:
-
Save preferences on exit: lets
FlightGear save preferences that you changed from the
menu in the FlightGear (fgfs) main window will be
saved to
$HOME/.fgfs/autosave.xml. - Control: specifies the control device you will use in FlightGear. auto, joystick, mouse, and keyboard are available. You can leave it as auto unless you really want to change it manually.
- Unit: specifies the unit used in FlightGear. feet and |meters are available.
- Time of day: specifies the time of day. Available options are real, dawn, morning, noon, afternoon, dusk, evening, and midnight.
- Season: specifies the season of FlightGear world. You can choose either summer or winter.
- Sound: disabling this will cut all the sound in FlightGear.
- Instrumental panel: specifies if 2D panel is drawn from the beginning. You can also enable/disable the 2D panel from FlightGear menu
- Random objects: specifies whether FlightGear draws random objects or not
- AI models: specifies whether FlightGear handles AI aircraft and ships
- Clock never advances: specifies whether the clock advances in FlightGear or not
- No fuel consumption: makes aircraft consume no fuel while it’s flying
- Start in a frozen state: starts FlightGear with frozen state. it does not seem working at this moment.
- Display HUD: displays HUD at the beginning, I guess. You can turn HUD on/off by pressing ’h’ while you are flying.
- 3D HUD: enables 3D HUD if an selected aircraft supports it
- Real weather fetch: enables fetching real weather condition using METAR
- Horizon effect: enables horizon effect
- Clouds: enables drawing clouds
- 3D clouds: enables drawing 3D clouds. You need to enable 3d clouds by checking 3D cloud from the View » Rendering option on the FlightGear simulator window.
- Turbulence: specifies the strength of turbulence. 0.0 is calm and 1.0 is severe. You need to specify value from 0.0 through 1.0
- Visibility: specifies the visibility in meter. You can specify 5000 or less if FlightGear runs slow on your machine.
- Fullscreen mode: enabling this will launch FlightGear as full-screen mode
- Window size: specifies the size of FlightGear window. It will be ignored when full-screen mode is enabled
- Sky blending: enables or disables FlightGear to blend the sky depending on time and surrounding environment. DO NOT disable this option, or FlightGear crashes.
- Textures: enables or disables textures on runways, buildings, and scenery objects. Disabling this will give you some more fps, effective especially on G4 Macs.
- Wireframe: lets FlightGear draw wire-frames so you can see how the world of FlightGear is drawn. This should be enabled only for debug / development purpose.
- Fog: specifies how fog is drawn. disable, fastest, nicest are available.
Favorite tab
Favorite list provides a means of preserving a named set of current options like a book mark of a web browser. To save the current set of options, press “+” button on the top window or at the bottom of the Favorite tab. Once favorites are added, You can switch from one configuration to another by double-clicking a row in the table view in the Favorite tab. Pressing “-” button (or delete key) on a favorite in the table view deletes the selected favorite.
Position
You can find airports or aircraft carriers by searching with a keyword into the filter text area. Available keywords are:
- For airports
- a part of airport name (e.g. international, ranch, or civil)
- country name (such as Japan, USA, or France) if available
- location name (such as city or county or U.S. state abbrev. if available)
- IATA code (such as SFO, LAX, HND) if available
- ICAO code (such as KSFO, KLAX, RJTT) - works on all airports
- For aircraft carriers
- carrier name (Nimitz or Eisenhower)
- “carrier”
Airports and carriers that match the keyword are shown at the table view below the filter text area. The airport name at the upper pane is synchronized with the currently selected airport or carrier. You can also open this tab by clicking the gear button at the right end of airport name on the top pane.
When you choose an airport, available runways show up at the “runway” pop-up button. You can choose a runway or leave it as “default.”
Aircraft tab
You can find aircraft by searching with a keyword into the filter text area. Available keywords are:
- a part of aircraft name (e.g. c172, zero, shinden)
- configuration file name without -set.xml (e.g. a6m2, p51d)
- fdm (Flight Dynamics Model) name (e.g. yasim, jsb)
- status (e.g. alpha, beta, production, development)
A list of aircraft that match the keyword shows up at the table view below the filter text area. The aircraft name at the upper pane is synchronized with the currently selected aircraft. You can also open this tab by clicking the gear button at the right end of aircraft name on the top pane.
If you want to find more aircraft data from the internet, click “Get Aircraft” button at the bottom of the Aircraft tab. It opens a web browser to lead you to the Aircraft Links page on FlightGear Mac OS X web site. you can visit some links there and download an aircraft you want. Once an aircraft is downloaded, open “Others” tab to install it.
If you encounter some weird behavior in searching aircraft, removing a cache file for
aircraft database might solve your problem. open
/Applications/Utilities/Terminal.app and type the
following commands to remove the cache file:
rm AircraftCache.rb
Note that you must not launch FlightGear from mounted disk image of a prebuilt binary package since the folder in the mounted disk image is read-only, which prevents you from installing any add-on data. you need to install FlightGear by copying the FlightGear icon from the mounted disk image to /Applciations folder.
Network tab
This tab contains two network features of FlightGear. One is multi-player mode and another is FGCOM (a voice ATC). To enable multi-player mode, specify the followings:
- Enable Multiplay: enables or disables multi-player mode. Enabling this will open a new browser window to show the map on a multi player server.
- Callsign: specifies the name shown in the map. Username must contain only alphabet letters, numbers, underscores, and dots. FlightGear will exit when you specify a call sign with invalid characters. A user name with 8 or more characters will be truncated into the first 7 characters.
- Server: specifies the server to connect. mpserver02.flightgear.org is available at the time of writing this.
- Your Mac: specifies your Mac’s IP address. Usually the launcher detects the address automatically. If something is wrong with network connection, clear this text field.
- Port: must be 5000
FGCOM enables you to make a real voice communication using radio setting. You can talk at a selected radio frequency (COM1) while pressing space bar. You can listen to some other player’s talking in the frequency if some others are using the same frequency and you are in range. The options available for FGCOM are listed below:
- Enable FGCOM in Multi Player mode: specifies if you use FGCOM when Multiplay is enabled.
- FGCOM Server: specifies a VOIP server.
For further instructions on FGCOM, and Multiplay, please see Chapter 5.
Others tab
You can specify any options other than aircraft, airport, and the options shown in the launcher. Entering space-separated options as shown in Figure 11 will pass additional options to FlightGear. You can see all available options by pressing “View Options.” Some options might cause FlightGear crash. If you encounter such crashes with a specific option, please let us know.
To install additional aircraft and scenery data, press "Install Add-on Data." You can specify multiple files and/or folders to install to the FlightGear data folder. Acceptable file types are:
- zip
- tar
- tar.gz
- tar.bz2
- folder
- 7zip (only if 7zip is installed)
You will see the message window when all the data is successfully installed, otherwise error message will show up. You can select both aircraft and scenery data at the same time. If you select an archived file that does not contain aircraft files, it will be extracted into the data folder, but will be ignored. When you finish installing new aircraft, you can select the aircraft on the “Aircraft” tab.
3.4.6 Launching from the command line
You can also launch the simulator from the command line on Mac OS X. To do so, open Terminal.app (located at /Applications/Utilities) and type the following commands:
./fgfs --option1 --option2 ....
See chapter 3.5 for detail information on command line options. Unlike the other platforms, you don’t have to manually specify the environment variables such as FG_ROOT and FG_SCENERY as long as you use a prebuilt binary package.
3.5 Command line parameters
Following is a complete list and short description of the numerous command line options available for FlightGear. Most of these options are exposed through the FlightGear launcher delivered with the Windows binaries.
If you have options you re-use continually, you can create a preferences file containing a set of command-line options that will be set automatically. You can create the file with any text editor (notepad, emacs, vi, if you like).
- On Unix systems (including Mac OS X), put the command line options in a file called .fgfsrc in your home directory.
- On Windows, put the command line options in a file called system.fgfsrc in the FG_ROOT directory (e.g. c:\Program Files\FlightGear\data).
3.5.1 General Options
-
--help
Display the most relevant command line options.
-
--help--verbose
Display all command line options.
-
--language=code
Select the language for this session. e.g. pl, nl, it, fr, en, de.
-
--version
Display the current FlightGear version.
-
--fg-root=path
Tells FlightGear where to look for its root data files if you didn’t compile it with the default settings.
-
--fg-scenery=path
Allows specification of a path to the base scenery path , in case scenery is not at the default position under $FG ROOT/Scenery; this might be especially useful in case you have scenery on a CD-ROM.
-
--enable-save-on-exit,
--disable-save-on-exit
Enable or disable saving of user-preferences on exit from the simulator.
-
--enable-freeze,
--disable-freeze
Control whether FlightGear starts paused or not. Defaults to not paused.
-
--control=mode
Specify your primary control mode (joystick, keyboard, mouse) Defaults to joystick.
-
--enable-auto-coordination,
--disable-auto-coordination
Switches auto-co-ordination between aileron and rudder on/off. Auto-coordination is recommended for users without rudder pedals or a ‘twist’ joystick. Defaults to off.
-
--browser-app=path
Specify location of your web browser. E.g: --browser-app=
“C:\Program Files\Internet Explorer\iexplore.exe” (Note the “ ” because of the spaces!). -
--config=path
Load additional properties from the given path. E.g:
--config=./Aircraft/X15-set.xml -
--units-feet
Use feet as the unit of measurement.
- --units-meters Use meters as the unit of measurement.
3.5.2 Features
-
--enable-ai-models,
--disable-ai-models
Enable or disable other aircraft/AI-models in the simulator.
-
--ai-scenario=name
Enable a specific AI scenario (e.g. --ai-scenario=vinson-demo). May be used multiple times.
-
--enable-random-objects,
--disable-random-objects
Enable, disable random scenery objects (buildings/trees). Enabled by default.
3.5.3 Sound
-
--enable-sound,
--disable-sound
Enable or disable sound.
-
--show-sound-devices
Show the available sound devices.
-
--sound-device=device
Specify the sound device to use for audio.
-
--enable-intro-music,
--disable-intro-music
Enable or disable playing an audio sample when FlightGear starts up.
3.5.4 Aircraft
-
--aircraft=aircraft
Load the specified aircraft, for example: --aircraft=c172p. For available choices check the directory $FG ROOT/Aircraft, and look for files ending in “-set.xml”. When specifying the aircraft, drop the “-set.xml” from the filename. Alternatively, use the --show-aircraft option described below to list the available aircraft. For information on downloading additional aircraft, see Section 2.2 .
-
--show-aircraft
Print a sorted list of the currently available aircraft types.
-
--min-status=status
Display only those aircraft with a specified minimum declared status, one of alpha, beta, early-production, production. For use with --show-aircraft.
-
--aircraft-dir=PATH
Aircraft directory relative to the executable location. Defaults to $FG ROOT/Aircraft.
-
--vehicle=name of
aircraft definition file
Synonym for --aircraft.
-
--livery=Name
Set the aircraft livery.
3.5.5 Flight model
-
--fdm=abcd
Select the core flight model. Options are jsb, larcsim, yasim, magic, balloon, external, pipe, ada, null. This option can normally be ignored, as the --aircraft option will set the FDM correctly.
-
--aero=aircraft
Specifies the aircraft aeronautical model to load. This option can normally be ignored, as the --aircraft option will set the aircraft model correctly.
-
--model-hz=n
Run the Flight Dynamics Model with this rate (iterations per second).
-
--speed=n
Run the Flight Dynamics Model this much faster than real time.
-
--trim, --notrim
Trim (or not) when initializing JSBSim. Defaults to trim.
-
--on-ground,
--in-air
Start up at ground level (default), or in the air. If specifying --in-air you must also set an initial altitude using --altitude, and may also want to set an initial velocity with --vc. Note that some aircraft (notably the X15) must be started in mid-air.
-
--enable-fuel-freeze,
--disable-fuel-freeze
Control whether fuel state is constant (e.g. frozen) or consumed normally (default).
3.5.6 Initial Position and Orientation
-
--airport=ABCD
Start at a specific airport. The airport is specified by its ICAO code, e.g. --airport=KJFK for JFK airport in New York. For US airport without an ICAO code, try prefixing the 3 character code with ‘K’.
-
--parking-id=ABCD
Start at a specific parking spot on the airport.
-
--runway=NNN
Start at the threshold of a specific runway (e.g. 28L). If no runway or parking ID is specified, a runway facing into the wind will be chosen for takeoff.
-
--vor=ABCD,
--ndb=ABCD,
--fix=ABCD
Set the starting position relative to a VOR, NDB or FIX. Useful for practising approaches.
-
--carrier=NAME
Start on an aircraft carrier. See 5.2 for details of carrier operations.
-
--parkpos=NAME
Start at a particular parking position on the carrier. Must be used with --carrier. Defaults to a catapult launch position.
-
--offset-distance=nm,
--offset-azimuth=deg
Start at a particular distance and heading from a position set using --airport, --vor, --ndb, --fix, --carrier.
-
--lon=degrees,
--lat=degrees
Start at a particular longitude and latitude, in decimal degrees (south, west negative).
-
--altitude=feet
Start at specific altitude. Implies --in-air. Altitude is specified in feet unless you also select --units-meters, in which case altitude is in meters. You may also want to set an initial velocity with --vc to avoid stalling immediately.
-
--heading=degrees,
--roll=degrees,
--pitch=degrees
Set the initial orientation of the aircraft. All values default to 0 - heading North, in straight and level flight.
-
--uBody=X,
--vBody=Y,
--wBody=Z
Set the initial speed along the X, Y and Z axes. Speed is in feet per second unless you also select --units-meters, in which case altitude is in meters per second.
-
--vNorth=N,
--vEast=E,
--vDown=D
Set the initial speed along the South-North, West-East and vertical axes. Speed is in feet per second unless you also select --units-meters, in which case altitude is in meters per second.
-
--vc=knots,
--mach=num
Set the initial airspeed in knots or as a Mach number. Useful if setting --altitude, unless you want to stall immediately!
-
--glideslope=degrees,
--roc=fpm
Set the initial glide slope angle in degrees or as a climb rate in feet per minute. May be positive or negative.
3.5.7 Environment Options
-
--ceiling=FT ASL[:THICKNESS FT]
Sets an overcase ceiling at a particular height, and with an optional thickness (defaults to 2000ft).
-
--enable-real-weather-fetch,
--disable-real-weather-fetch
Control whether real-time weather information is downloaded and used.
-
--metar=METAR
STRING
Use a specific METAR string, e.g. --metar=~XXXX 012345Z 00000KT 99SM CLR 19/M01 A2992~. The METAR may be specified in most common formats (US, European). Incompatible with --enable-real-weather-fetch.
-
--random-wind
Sets random wind direction and strength.
-
--turbulence=n
Sets turbulence from completely calm (0.0) to severe (1.0).
-
--wind=DIR@SPEED
Specify the surface wind. Direction is in degrees, and speed in knots. Values may be specified as a range by using a colon separator; e.g. --wind=180:220@10:15.
-
--season=param
Sets the simulated season. Valid parameters are summer (default), winter.
- --visibility=meters, --visibility-miles=miles
3.5.8 Rendering Options
-
--aspect-ratio-multiplier=N
Set a multiplier for the display aspect ratio.
-
--bpp=depth
Specify the bits per pixel.
- --enable-clouds, --disable-clouds
-
--enable-clouds3d,
--disable-clouds3d
Enable (default), disable 3D clouds. Very pretty, but depend on your graphics card supporting GLSL Shaders, which some older, or less powerful graphics cards do not.
-
--enable-distance-attenuation,
--disable-distance-attenuation
Enable or disable more realistic runway and approach light attenuation.
-
--enable-enhanced-lighting,
--disable-enhanced-lighting
Enable or disable more realistic runway and approach lights.
-
--enable-fullscreen,
--disable-fullscreen
Enable, disable (default) full screen mode.
-
--enable-game-mode,
--disable-game-mode
Enable or disable full screen display for 3DFX graphics cards.
-
--enable-horizon-effect,
--disable-horizon-effect
Enable (default), disable celestial body growth illusion near the horizon.
-
--enable-mouse-pointer,
--disable-mouse-pointer
Enable, disable (default) extra mouse pointer. Useful in full screen mode for old Voodoo based cards.
- --enable-panel, --disable-panel
-
--enable-skyblend,
--disable-skyblend
Enable (default), disable fogging/haze.
-
--enable-specular-highlight,
--disable-specular-highlight
Enable (default), disable specular highlights.
-
--enable-splash-screen,
--disable-splash-screen
Enable or disable (default) the rotating 3DFX logo when the accelerator board gets initialized (3DFX only).
-
--enable-textures,
--disable-textures
Enable (default), disable use of textures.
-
--enable-wireframe,
--disable-wireframe
Enable, disable (default) display of wireframes. If you want to know what the world of FlightGear looks like internally, try this!
-
--fog-disable,
--fog-fastest,
--fog-nicest
Set the fog level. To cut down the rendering efforts, distant regions vanish in fog by default. If you disable fog you’ll see farther, but your frame rates will drop. Using --fog-fastest will display a less realistic fog, by increase frame rate. Default is --fog-nicest.
- --fov=degrees
-
--geometry=WWWxHHH
Defines the window/screen resolution. E.g. --geometry=1024x768..
-
--shading-smooth,
--shading-flat
Use smooth shading (default), or flat shading which is faster but less pretty.
-
--texture-filtering=N
Configure anisotropic texture filtering. Values are 1 (default), 2, 4, 8 or 16.
-
--view-offset=xxx
Allows setting the default forward view direction as an offset from straight ahead. Possible values are LEFT, RIGHT, CENTER, or a specific number of degrees. Useful for multi-window display.
3.5.9 HUD Options
-
--enable-anti-alias-hud,
--disable-anti-alias-hud
Control whether the HUD (Head Up Display) is shown anti-aliased.
-
--enable-hud,
--disable-hud
Control whether the HUD is displayed. Defaults to disabled.
-
--enable-hud-3d,
--disable-hud-3d
Control whether the 3D HUD is displayed.
-
--hud-culled,
--hud-tris
Display the percentage of triangles culled, or the number of triangles rendered in the HUD. Mainly of interest to graphics developers.
3.5.10 Aircraft System Options
-
--adf=[radial:]frequency
Set the ADF frequency and radial.
-
--com1=frequency,
--com2=frequency
Set the COM1/COM2 radio frequency.
-
--dme=nav1|nav2|frequency
Set the DME to NAV1, NAV2, or a specific frequency and radial.
-
--failure=system
Fail a specific aircraft system. Valid systems are pitot, static, vacuum, electrical. Specify multiple times to fail multiple systems.
-
--nav1=[radial:]frequency,
--nav2=[radial:]frequency
Set the NAV1/NAV2 radio frequency and radial.
3.5.11 Time Options
-
--enable-clock-freeze,
--disable-clock-freeze
Control whether time advances normally or is frozen.
-
--start-date-gmt=yyyy:mm:dd:hh:mm:ss,
--start-date-lat=yyyy:mm:dd:hh:mm:ss,
--start-date-sys=yyyy:mm:dd:hh:mm:ss
Specify the exact startup time/date. The three functions differ in that they take either Greenwich Mean Time, the local time of your virtual flight, or your computer system’s local time as the reference point.
Incompatible with --time-match-local, --time-match-real.
-
--time-match-local,
--time-match-real
--time-match-real, is default: Simulator time is read from the system clock, and is used as is. When your virtual flight is in the same timezone as where your computer is located, this may be desirable, because the clocks are synchronized. However, when you fly in a different part of the world, it may not be the case, because there is a number of hours difference, between the position of your computer and the position of your virtual flight.
The option --time-match-local takes care of this by computing the timezone difference between your real world time zone and the position of your virtual flight, and local clocks are synchronized.
Incompatible with --start-date-gmt, --start-date-lat, --start-date-sys.
-
--time-offset=[+-]hh:mm:ss
Specify a time offset relative to one of the time options above.
-
--timeofday=param
Set the time of day. Valid parameters are real, dawn, morning, noon, afternoon, dusk, evening, midnight.
3.5.12 Network Options
-
--multiplay=dir,Hz,host,port,
--callsign=ABCD
Set multiplay options and aircraft call-sign. See Section 5.1.
-
--httpd=port,
--telnet=port
Enable http server or telnet server on the specified port to provide access to the property tree.
-
--jpg-httpd=port
Enable screen shot http server on the specified port.
-
--proxy=[user:password@]host:port
Specify a proxy server to use.
3.5.13 Route/Waypoint Options
-
--wp=ID[@alt]
Allows specifying a waypoint for the GC autopilot; it is possible to specify multiple waypoints (i.e. a route) via multiple instances of this command.
-
--flight-plan=[file]
This is more comfortable if you have several waypoints. You can specify a file to read them from.
NB: These options are rather geared to the advanced user who knows what he is doing.
3.5.14 IO Options
More detailed descriptions of the various IO parameters can be found in the README.IO file within the Docs directory of your FlightGear installation.
-
--atlas=params
Open connection using the Atlas protocol (used by Atlas and TerraSync).
-
--atcsim=params
Open connection using the ATC Sim protocol (atc610x).
-
--AV400=params
Open connection to drive a Garmin 196/296 series GPS
-
--AV400Sim=params
Open connection to drive a Garmin 400 series GPS
-
--generic=params
Open connection using the Generic (XML-defined) protocol.
-
--garmin=params
Open connection using the Garmin GPS protocol.
-
--joyclient=params
Open connection to an Agwagon joystick.
-
--jsclient=params
Open connection to a remote joystick.
-
--native-ctrls=params
Open connection using the FG native Controls protocol.
-
--native-fdm=params
Open connection using the FG Native FDM protocol.
-
--native-gui=params
Open connection using the FG Native GUI protocol.
-
--native=params
Open connection using the FG Native protocol.
-
--nmea=params
Open connection using the NMEA protocol.
-
--opengc=params
Open connection using the OpenGC protocol.
-
--props=params
Open connection using the interactive property manager.
-
--pve=params
Open connection using the PVE protocol.
-
--ray=params
Open connection using the RayWoodworth motion chair protocol.
-
--rul=params
Open connection using the RUL protocol.
3.5.15 Debugging options
-
--enable-fpe
Enable abort on a Floating Point Exception.
-
--fgviewer
Instead of loading the entire simulator, load a lightweight OSG viewer. Useful for checking aircraft models.
-
--log-level=LEVEL
Set the logging level. Valid values are bulk, debug, info, warn, alert.
-
--prop:[type:]name=value
Set property name to value
Example: --prop:/engines/engine[0]/running=true starts the simulator with running engines.
Another example:
--aircraft=c172p
--prop:/consumables/fuels/tank[0]/level-gal=10
--prop:/consumables/fuels/tank[1]/level-gal=10
fills the Cessna for a short flight. You may optionally specific the property type (double, string, boolean).
-
--trace-read=params
Trace the reads for a property; multiple instances are allowed.
-
--trace-write=params
Trace the writes for a property; multiple instances are allowed.
3.6 Joystick support
Could you imagine a pilot in his or her Cessna controlling the machine with a keyboard alone? For getting the proper feeling of flight you will need a joystick/yoke plus rudder pedals, right? However, the combination of numerous types of joysticks, flightsticks, yokes, pedals etc. on the market with the several target operating systems, makes joystick support a non-trivial task in FlightGear.
FlightGear has integrated joystick support, which automatically detects any joystick, yoke, or pedals attached. Just try it! If this does work for you, lean back and be happy! You can see what FlightGear has detected your joystick as by selecting Help -> Joystick Information from the menu.
Unfortunately, given the several combinations of operating systems supported by FlightGear (possibly in foreign languages) and joysticks available, chances are your joystick does not work out of the box. Basically, there are two alternative approaches to get it going, with the first one being preferred.
3.6.1 Built-in joystick support
General remarks
In order for joystick auto-detection to work, a joystick bindings xml file must exist for each joystick. This file describes what axes and buttons are to be used to control which functions in FlightGear. The associations between functions and axes or buttons are called “bindings”. This bindings file can have any name as long as a corresponding entry exists in the joysticks description file
/FlightGear/joysticks.xml
which tells FlightGear where to look for all the bindings files. We will look at examples later.
FlightGear includes several such bindings files for several joystick manufacturers in folders named for each manufacturer. For example, if you have a CH Products joystick, look in the folder
/FlightGear/Input/Joysticks/CH
for a file that might work for your joystick. If such a file exists and your joystick is working with other applications, then it should work with FlightGear the first time you run it. If such a file does not exist, then we will discuss in a later section how to create such a file by cutting and pasting bindings from the examples that are included with FlightGear.
Verifying your joystick is working
Does your computer see your joystick? One way to answer this question under Linux is to reboot your system and immediately enter on the command line
dmesg | grep Joystick
which pipes the boot message to grep which then prints every line in the boot message that contains the string “Joystick”. When you do this with a Saitek joystick attached, you will see a line similar to this one:
input0: USB HID v1.00 Joystick [SAITEK CYBORG 3D USB] on usb2:3.0
This line tells us that a joystick has identified itself as SAITEK CYBORG 3D USB to the operating system. It does not tell us that the joystick driver sees your joystick. If you are working under Windows, the method above does not work, but you can still go on with the next paragraph.
Confirming that the driver recognizes your joystick
FlightGear ships with a utility called js demo. It will report the number of joysticks attached to a system, their respective “names”, and their capabilities. Under Linux, you can run js demo from the folder /FlightGear/bin as follows:
$ cd /usr/local/FlightGear/bin
$
./js demo
Under Windows, open a command shell (Start All Programs
 Accessories), go to the FlightGear
binary folder and start the program as follows (given
FlightGear is installed under
c:\Flightgear)
Accessories), go to the FlightGear
binary folder and start the program as follows (given
FlightGear is installed under
c:\Flightgear)
cd
\FlightGear\bin
js demo.exe
Under Mac OS X, open Terminal.app (/Applications/Utilities/) and run js demo as follows:
$ cd /Applications/FlightGear.app/Contents/Resources
$
./js demo
On our system, the first few lines of output are (stop the program with Ctrl-C if it is quickly scrolling past your window!) as follows:
Joystick test
program.
Joystick 0: “CH PRODUCTS CH FLIGHT SIM YOKE USB
”
Joystick 1: “CH PRODUCTS CH PRO PEDALS USB”
Joystick 2 not detected
Joystick 3 not detected
Joystick 4 not detected
Joystick 5 not detected
Joystick 6 not detected
Joystick 7 not detected
+——————–JS.0———————-+——————–JS.1———————-+
| Btns Ax:0 Ax:1 Ax:2 Ax:3 Ax:4 Ax:5 Ax:6 | Btns Ax:0 Ax:1 Ax:2
|
+———————————————-+———————————————-+
| 0000 +0.0 +0.0 +1.0 -1.0 -1.0 +0.0 +0.0 . | 0000 -1.0 -1.0
-1.0 . . . . . |
First note that js demo reports which number is assigned to each joystick recognized by the driver. Also, note that the “name” each joystick reports is also included between quotes. We will need the names for each bindings file when we begin writing the binding xml files for each joystick.
Identifying the numbering of axes and buttons
Axis and button numbers can be identified using js demo as follows. By observing the output of js demo while working your joystick axes and buttons you can determine what axis and button numbers are assigned to each joystick axis and button. It should be noted that numbering generally starts with zero.
The buttons are handled internally as a binary number in which bit 0 (the least significant bit) represents button 0, bit 1 represents button 1, etc., but this number is displayed on the screen in hexadecimal notation, so:
0001 ⇒ button 0 pressed
0002 ⇒ button 1 pressed
0004 ⇒ button 2 pressed
0008 ⇒ button 3 pressed
0010 ⇒ button 4 pressed
0020 ⇒ button 5 pressed
0040 ⇒ button 6 pressed
... etc. up to ...
8000 ⇒ button 15 pressed
... and ...
0014 ⇒ buttons 2 and 4 pressed simultaneously
... etc.
For Linux users, there is another option for identifying the “name” and the numbers assigned to each axis and button. Most Linux distributions include a very handy program, “jstest”. With a CH Product Yoke plugged into the system, the following output lines are displayed by jstest:
jstest /dev/js3
Joystick (CH PRODUCTS CH FLIGHT SIM YOKE USB ) has 7 axes and 12
buttons. Driver version is 2.1.0
Testing…(interrupt to
exit)
Axes: 0: 0 1: 0 2: 0 3: 0 4: 0 5: 0 6: 0 Buttons: 0:off 1:off
2:off 3:on 4:off 5:off 6:off 7:off 8:off 9:off 10:off
11:off
Note the “name” between parentheses. This is the name the system associates with your joystick.
When you move any control, the numbers change after the axis number corresponding to that moving control and when you depress any button, the “off” after the button number corresponding to the button pressed changes to “on”. In this way, you can quickly write down the axes numbers and button numbers for each function without messing with binary.
Writing or editing joystick binding xml files
At this point, you have confirmed that the operating system and the joystick driver both recognize your joystick(s). You also know of several ways to identify the joystick “name” your joystick reports to the driver and operating system. You will need a written list of what control functions you wish to have assigned to which axis and button and the corresponding numbers.
Make the following table from what you learned from js demo or jstest above (pencil and paper is fine). Here we assume there are 5 axes including 2 axes associated with the hat.
| Axis | Button |
|
|
|
| elevator = 0 | view cycle = 0 |
| rudder = 1 | all brakes = 1 |
| aileron = 2 | up trim = 2 |
| throttle = 3 | down trim = 3 |
| leftright hat = 4 | extend flaps = 4 |
| foreaft hat = 5 | retract flaps = 5 |
| decrease RPM = 6 | |
| increase RPM = 7 |
We will assume that our hypothetical joystick supplies the “name” QUICK STICK 3D USB to the system and driver. With all the examples included with FlightGear, the easiest way to get a so far unsupported joystick to be auto detected, is to edit an existing binding xml file. Look at the xml files in the sub-folders of /FlightGear/Input/Joysticks/. After evaluating several of the xml binding files supplied with FlightGear, we decide to edit the file
/FlightGear/Input/Joysticks/Saitek/Cyborg-Gold-3d-USB.xml.
This file has all the axes functions above assigned to axes and all the button functions above assigned to buttons. This makes our editing almost trivial.
Before we begin to edit, we need to choose a name for our bindings xml file, create the folder for the QS joysticks, and copy the original xml file into this directory with this name.
$ cd /usr/local/FlightGear/Input/Joysticks
$ mkdir QS
$ cd QS
$ cp /usr/local/FlightGear/Input/Joysticks/Saitek/
Cyborg-Gold-3d-USB.xml QuickStick.xml
Here, we obviously have supposed a Linux/UNIX system with FlightGear being installed under /usr/local/FlightGear. For a similar procedure under Windows with FlightGear being installed under c:FlightGear, open a command shell and type
c:
cd /FlightGear/Input/Joysticks
mkdir QS
cd QS
copy /FlightGear/Input/Joysticks/Saitek/
Cyborg-Gold-3d-USB.xml QuickStick.xml
Next, open QuickStick.xml with your favorite editor. Before we forget to change the joystick name, search for the line containing <name>. You should find the line
<name>SAITEK CYBORG 3D USB</name>
and change it to
<name>QUICK STICK 3D USB</name>.
This line illustrates a key feature of xml statements. They begin with a <tag> and end with a </tag>.
You can now compare your table to the comment table at the top of your file copy. Note that the comments tell us that the Saitek elevator was assigned to axis 1. Search for the string
<axis n=~1~>
and change this to
<axis n=~0~>.
Next, note that the Saitek rudder was assigned to axis 2. Search for the string
<axis n=~2~>
and change this to
<axis n=~1~>.
Continue comparing your table with the comment table for the Saitek and changing the axis numbers and button numbers accordingly. Since QUICKSTICK USB and the Saitek have the same number of axes but different number of buttons, you must delete the buttons left over. Just remember to double-check that you have a closing tag for each opening tag or you will get an error using the file.
Finally, be good to yourself (and others when you submit your new binding file to a FlightGear developers or users archive!) by taking the time to change the comment table in the edited file to match your changed axis and button assignments. The new comments should match the table you made from the js demo output. Save your edits.
Several users have reported that the numbers of axes and buttons assigned to functions may be different with the same joystick under Windows and Linux. The above procedure should allow one to easily change a binding xml file created for a different operating system for use by their operating system.
Telling FlightGear about your new bindings xml file
Before FlightGear can use your new xml file, you need to edit the file
/FlightGear/joysticks.xml,
adding a line that will include your new file if the “name” you entered between the name tags matches the name supplied to the driver by your joystick. Add the following line to joysticks.xml.
<js-named include=~Input/Joysticks/QS/QuickStick.xml~/>
You can tell how FlightGear has interpreted your joystick setup by selecting Help -> Joystick Information from the Menu.
Some hints for Windows users
Basically, the procedures described above should work for Windows as well. If your joystick/yoke/pedals work out of the box or if you get it to work using the methods above, fine. Unfortunately, however, it’s likely you may encounter a few problems.
The first one concerns users of non-US Windows versions. As stated above, you can get the name of the joystick from the program js demo. If you have a non-US version of Windows and the joystick .xml files named above do not contain that special name, just add it on top of the appropriate file in the style of
<name>Microsoft-PC-Joysticktreiber </name>
No new entry in the base joysticks.xml file is required.
Unfortunately, there is one more loophole with Windows joystick support. In the case that you have two USB devices attached (for instance, a yoke plus pedals), it’s possible that the same driver name will be reported twice. In this case, you can at least get the yoke working by assigning it number 0 (out of 0 and 1). For this purpose, rotate the yoke (aileron control) and observe the output of js demo. If figures in the first group of colons (for device 0) change, assignment is correct. If figures in the second group of colons (for device 1) change, you have to make the yoke the preferred device first. For doing so, enter the Windows “Control panel”, open “Game controllers” and select the “Advanced” button. Here you can select the yoke as the “Preferred” device. Afterward you can check that assignment by running js demo again. The yoke should now control the first group of figures.
Unfortunately, we did not find a way to get the pedals to work, too, that way. Thus, in cases like this one (and others) you may want to try an alternative method of assigning joystick controls.
Some hints for Mac OS X users
Thanks to Mac OS X, most of HID compatible joysticks are recognized and usable on Mac OS X. Some of joysticks are already defined properly in FlightGear. However, sometimes your joystick does not work as you expect due to some reasons such as missing joystick ID, and misconfigured buttons or axis. In such cases, you need to modify a joystick configuration file.
The basic procedures in configuring joysticks under Mac OS X are the same as those of Linux as described above. The main differences are the path to the joystick configuration files and the means of finding a joystick name. The joystick configuration files are at Contents/Resources/data/Input/Joysticks under the FlightGear.app folder. You can open the data folder by choosing “Advanced Features » Others » Open data folder” on the GUI launcher. You can also open it by right-clicking the FlightGear icon at Applications folder and choose “Show Package Contents” to access the folders inside the application. To find a joystick name, follow the steps below:
- Open System Profiler by choosing Apple Menu | About this Mac | More Info...
- Select USB from the Hardware list in the left pane.
- Find the name of your joystick (e.g. Logitech Extreme 3D) from the USB Device Tree.
- Add a name tag with the recognized joystick name to a proper configuration XML file (e.g. <name>Logitech Extreme 3D</name>)
- Check if your device name is shown properly by choosing Help | Joystick information from the menu on the FlightGear simulator window.
In case your joystick doesn’t work as expected even it is recognized properly, you need to modify the button and/or axis settings. Some Mac users reported that twisting a joystick controls the throttle instead of the rudder. This is a typical joystick misconfiguration on Mac OS X. To fix this issue, you need to edit two axis tags in a joystick configuration file.
In many cases, the rudder is assigned to axis 2 and the throttle to axis 3 in driver level. Editing or adding a mac tag inside an axis tag for the rudder (and throttle) will fix this problem. The example below is a part of a joystick configuration file that assigns axis 3 for rudder control.
<desc>Rudder</desc>
<number>
<linux>2</linux>
<mac>3</mac> <!-- This must be 2 -->
<windows>3</windows>
</number>
.....
3.6.2 Joystick support via .fgfsrc entries
Fortunately, there is now a utility available which makes things easier for the average, non-XML savvy user.
To configure your joystick using this approach do the following:
- Open a command shell. Under Windows this is known as a Command prompt and can be found under Start -> All programs -> Accessories
- Change to the directory /FlightGear/bin (e.g. cd c:\FlightGear\bin).
- Run the fgjs tool.
The program will tell you which joysticks, if any, were detected. Now follow the commands given on screen, i.e. move the axis and press the buttons as required. Be careful, a minor touch already “counts” as a movement. Check the reports on screen. If you feel something went wrong, just re-start the program.
After you are done with all the axes and switches, the directory above will hold a file called fgfsrc.js. The contents on this file can be copied into your personal preferences file (.fgfsrc/system.fgfsrc). See 3.5 for details of how to create this file.
Note that output of fgjs is UNIX formatted. As a result, Windows Editor may not display it properly. It may be helpful to use an editor capable of handling UNIX files as well. My favorite freeware file editor for that purpose, although somewhat dated, is PFE, which can be obtained from http://www.lancs.ac.uk/staff/steveb/cpaap/pfe/.
The axis/button assignment of fgjs should at least get the axis assignments right, but the output may need some tweaking. For example, some axes may be moving the opposite way they should, or the dead zones may be too small. For instance, the elevator axes on my USB CH Yoke was reversed so I had to change
--prop:/input/joysticks/js[1]/axis[1]/binding/factor=-1.0
into
--prop:/input/joysticks/js[1]/axis[1]/binding/factor=1.0
To help with tuning, here is a short introduction into the assignments of joystick properties. Basically, all axes settings are specified via lines having the following structure:
--prop:/input/joysticks/js[n]/axis[m]/binding/command=property-scale
--prop:/input/joysticks/js[n]/axis[m]/binding/property=/controls/steering
option
--prop:/input/joysticks/js[n]/axis[m]/binding/dead-band=db
--prop:/input/joysticks/js[n]/axis[m]/binding/offset=os
--prop:/input/joysticks/js[n]/axis[m]/binding/factor=fa
where
| n | = | number of device (usually starting with 0) |
| m | = | number of axis (usually starting with 0) |
| steering option | = | elevator, aileron, rudder, throttle, mixture, pitch |
| dead-band | = | range within which signals are discarded. |
| Useful to avoid jittering for minor yoke movements | ||
| offset | = | Applies an offset after any factor. |
| Useful to handle devices where the neutral position does not map to 0. | ||
| factor | = | controls sensitivity of that axis; defaults to +1, |
| with a value of -1 reversing the behavior |
You should be able to at least get your joystick working along these lines. Concerning all the finer points, such as getting the joystick buttons working, John Check has written a very useful README included in the base package under $FG_ROOT/Docs/README.Joystick.html. In case of any trouble with your input device, it is highly recommended to read this document.
Google Advertisements - Click to support FlightGear
Latest Version
v2.0.0 - 18 Feb 2010
A new major update of the FligtGear simulator. Please check the readme
Notam

Would all pilots try and avoid mpserver02 as its often overloaded.